Do you have an idea but you have too much free thinking around it?
Do you need to organize your thoughts on a project in a focused and structured manner?
Do you need to clearly and easily communicate your vision to others?
Then you need to mind map it.
What is a mind map?
A mind map is a diagram used to visually outline information (Wikipedia). It is a great way of unraveling your thoughts and visualizing your ideas. A mind map is built from a single topic. This topic is located at the center, thus it is called the central idea. Usually, an image is used to represent the central idea. Then other ideas branch out from the central idea. We create branches and sub branches to represent these ideas related to our main topic. Here, we can use specific colours per branch to make each idea distinct and appealing. Place one keyword per branch. At first, this is hard to do since a single word is sometimes not enough to describe or express an idea. Keep practicing and eventually you get the hang of it. You can also put an image to a branch to visually describe your ideas.
Mind mapping with Mind42
Mind42 (pronounce as mind for two) is a free collaborative mind mapping tool. It is browser-based so there is no need to install. You just need to open your favorite web browser and go to mind42.com to launch the application.
Mind42 is easy to use for editing and sharing mind maps online. Mind42 can be shared with others via email, URL link, or be embedded into your blog or website. An even cooler feature of Mind42 is it let other users to collaborate on your mind map.
There are a lot of other mind mapping tools out there that you can use for free or for a fee. Lucidchart, Bubble.us, Wisemapping, Mindmeister and IMindMap are some of the mapping tools I tried. I think Mind42 has the most features there is for a collaborative mind mapping tool. And you can use it for free.
Here is a step by step tutorial on how you get started mind mapping using Mind42.
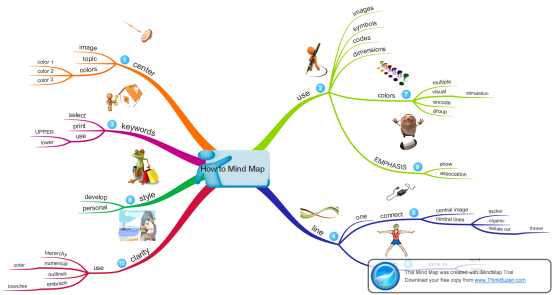
I also like using IMindMap because of the use of organic branches and have a cartoon-like visual perspective.
You can also do a mind map by hand. You just need a paper and some colored pens. Well, that how mind maps were originally made until mapping tools came to be. You can choose either way in creating mind maps for your topic of interest.
Mind Map Guidelines
Tony Buzan, a known expect on mind maps, gave us a few guidelines to help us create visually stimulating mind maps:
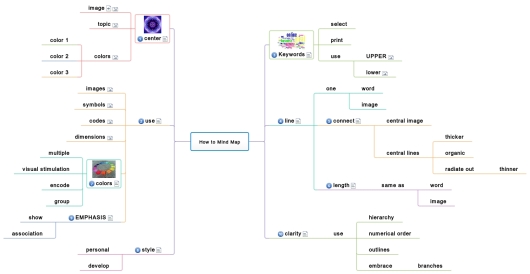
- Start in the centre with an image of the topic, using at least 3 colours.
- Use images, symbols, codes and dimensions throughout your Mind Map.
- Select key words and print using upper or lower case letters.
- Each word/image must be alone and sitting on its own line.
- The lines must be connected, starting from the central image. The central lines are thicker, organic and flowing, becoming thinner as they radiate out from the centre.
- Make the lines the same length as the word/image.
- Use colours – your own code – throughout the Mind Map.
- Develop your own personal style of Mind Mapping.
- Use emphasis and show associations in your Mind Map.
- Keep the Mind Map clear by using radial hierarchy, numerical order or outlines to embrace your branches.
Using Mind42, here is my version of a mind map based on Buzan’s guide on creating mind maps.
Here is another mind map I made using IMindMap.
As always, I wish I helped you gain more learning from this tutorial. Let me know how your mind mapping experience went.


