Posts Tagged ‘How to’

How to Use IFTTT

How to Use IFTTT

How to Use IFTTT

If you are the type of person who likes to learn things to make your virtual life easy, then you are in for a treat.

Let me introduce to you IFTTT (sounds like “gift” without the “g”).  It is a web tool that allows you to create connections between two different websites and services.  IFTTT is shortcut for “If This Then That”. It uses that formula to create an automatic action for a specific trigger. When the trigger  is set, IFTTT relays that action to create the outcome that you want.  For example, you can use IFTTT to automatically post your new blog post to your  Facebook, Twitter or your other social media accounts. You can also use IFTTT to back up your post to your favorite file storage site.

You can build these types of automation by setting up the recipe in IFTTT. A recipe looks like this:

IFTTT Recipe

IFTTT Recipe

You can create your own IFTTT recipe or use shared templates created by other users and change them to suit your needs. You just need to connect your social medial channels, add the trigger that sets your recipe to action and set the action that you want for your final outcome.

Setting up a recipe is a breeze. Here is a tutorial to show how you can create your own account and create your first IFTTT recipe. By the way, did I tell you that IFTTT is free to use? Well, YES it is!

So start getting creative and share your great recipes at IFTTT. Have fun!

How to create Mind Maps using Mind42

How to Mind Map

Photo by For Inspiration Only (on flickrCC)

Do you have an idea but you have too much free thinking around it?

Do you need to organize your thoughts on a project in a focused and structured manner?

Do you need to clearly and easily communicate your vision to others?

Then you need to mind map it.

What is a mind map?

A mind map is a diagram used to visually outline information (Wikipedia). It is a great way of unraveling your thoughts and visualizing your ideas.  A mind map is built from a single topic. This topic is located at the center, thus it is called the central idea.  Usually, an image is used to represent the central idea. Then other ideas branch out from the central idea. We create branches and sub branches to represent these ideas related to our main topic. Here, we can use specific colours per branch to make each idea distinct and appealing. Place one keyword per branch. At first, this is hard to do since a single word is sometimes not enough to describe or express an idea. Keep practicing and eventually you get the hang of it. You can also put an image to a branch to visually describe your ideas.

Mind mapping with Mind42

Mind42 (pronounce as mind for two) is a free collaborative mind mapping tool. It is browser-based so there is no need to install. You just need to open your favorite web browser and go to mind42.com to launch the application.

Mind42 is easy to use for editing and sharing mind maps online. Mind42 can be shared with others via email, URL link, or be embedded into your blog or website. An even cooler feature of Mind42 is it let other users to collaborate on your mind map.

There are a lot of other mind mapping tools out there that you can use for free or for a fee.  Lucidchart, Bubble.us, Wisemapping, Mindmeister and IMindMap are some of the mapping tools I tried.  I think Mind42 has the most features there is for a collaborative mind mapping tool. And you can use it for free.

Here is a step by step tutorial on how you get started mind mapping using Mind42.


I also like using IMindMap because of the use of organic branches and have a cartoon-like visual perspective.

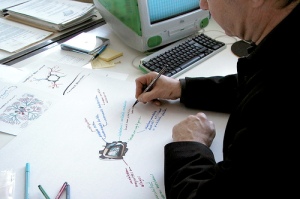
You can also do a mind map by hand. You just need a paper and some colored pens. Well, that how mind maps were originally made until mapping tools came to be.  You can choose either way in creating mind maps for your topic of interest.

Mind Map Guidelines

Tony Buzan, a known expect on mind maps, gave us a few guidelines to help us create visually stimulating mind maps:

  1. Start in the centre with an image of the topic, using at least 3 colours.
  2. Use images, symbols, codes and dimensions throughout your Mind Map.
  3. Select key words and print using upper or lower case letters.
  4. Each word/image must be alone and sitting on its own line.
  5. The lines must be connected, starting from the central image. The central lines are thicker, organic and flowing, becoming thinner as they radiate out from the centre.
  6. Make the lines the same length as the word/image.
  7. Use colours – your own code – throughout the Mind Map.
  8. Develop your own personal style of Mind Mapping.
  9. Use emphasis and show associations in your Mind Map.
  10. Keep the Mind Map clear by using radial hierarchy, numerical order or outlines to embrace your branches.

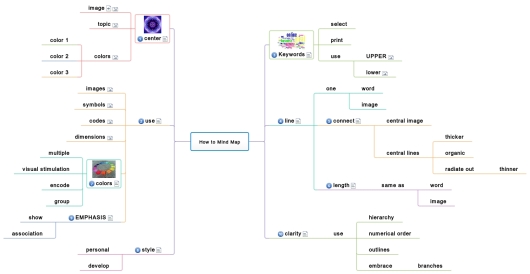
Using Mind42, here is my version of a mind map based on Buzan’s guide on creating mind maps.

How to Mind Map using Mind42

How to Mind Map using Mind42


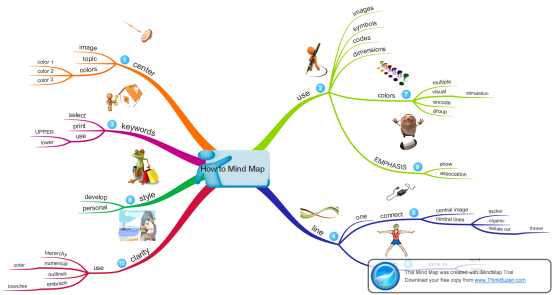
Here is another mind map I made using IMindMap.

How to Mind Map using IMindMap

How to Mind Map using IMindMap


As always, I wish I helped you gain more learning from this tutorial. Let me know how your mind mapping experience went.

How to Use ShortStack to Create a Facebook Contest

How to Use ShortStack to Create Facebook ContestsWould you like to increase the engagement activity in your Facebook page? You have a marketing strategy and that you would require names and emails of your target customers. Would you like them to give you their information?

Why not run a contest? Stir up a buzz by doing a sweepstakes. Everybody loves free stuffs and winning it by chance makes it even more exciting.  Raffle off a very nice price that they won’t want to miss out on.  This is a great way to promote your page and increase your fan base. You can also do a photo or video contest. Let your fans participate by submitting their own photos or videos; or voting for the photos or videos they like. I am sure this will build a lot of hype and engagement to your page.

Running a Facebook contest, however, is not that simple and straightforward. There is a right or should I say ‘legal’ way of doing so. According to the Facebook Page Terms and Standards, promotions should be run using a third party app. This includes sweepstakes and contests of any form. Using the like button and other features and functionality within Facebook is not allowed in any promotional activity. If you do this, Facebook can delete or remove your page.

So, what is the right way of doing a contest? Use an app. In this tutorial, I show you how to create your own Facebook contest the right way by using an app template available at ShortStack.

ShortStack is a design tool which allows you to create your custom Facebook tabs to suite your promotional needs. It also has a variety of widgets and templates which you can use to run your contest right away.  You can use ShortStack for free if you just need to run a simple sweepstakes contest. However, you need to avail of their paid services for several features like database storage for storing your promotional entries and analytics for monitoring your interactions over time.

Go to my Facebook page to see my sample contest. Let me know if you have any questions regarding this tutorial. Have a great day!

How to Create a Facebook Page for your Business

At this point in time, having a Facebook Page for your business is a must. With 800 million users1, Facebook is still the number one social media platform for online promotions and customer engagement.

How to Create a Facebook Page for your Business

By Alessio85

Facebook is free to use, so there is no worries if you are a small business with little or no budget for putting your business online. Having a Facebook page for your business is a good marketing strategy to build your online presence, engage your customers and expand your network by meeting new clients and business partners.

With Facebook, you can put up your company profile and share different types of information, such as photos, videos, blog posts, links to other sites, and other media to promote your business and services. You can now easily alert your customers whenever you have updates to share about your business.

Facebook got a new face

Last March 30, 2012, Facebook fully launch its new layout called Timeline. Even though there were some who literally ‘unlike’ the changes, Facebook has push through with its implementation of the new layout and a long with it some exciting features in posting updates and facilitating engagements.

One very distinguishing feature it presents is the cover photo. Located at the top of the page, your cover photo is the first thing visitors see. It has become the first and foremost face to promote your business or brand. They say, first impression lasts, so it is advantageous to have a unique and eye catching image that represents your page.

The Facebook cover photo is an image file (jpg or png) that’s 851 pixels wide and 315 pixels tall and less than 100 kilobytes. Your image can be the main product of your business, a photograph of your customer enjoying your service offerings or some events which highlight your company’s milestone.

Another identifiable part of the page is the profile picture. It is the 180 x 180 pixel image on the lower left corner of your cover photo. Since the cover photo and the profile picture overlap, many users even had the vision to blend them together into one single image.

Your cover photo is not limited to photos per se. You can also use text, charts, or graphs that you feel can convey your point across to your audience.

For example, this my current cover photo which is a wordle base on this blog.
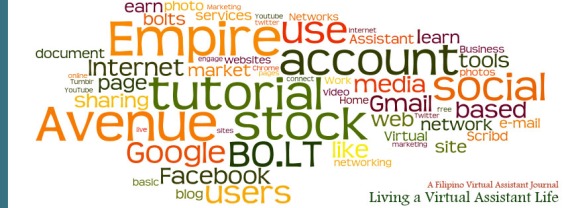
Facebook cover photo

wordle base on livingavirtualassistantlife.wordpress.com

The possibilities are infinite. However, there are some rules to consider. These are:

No Price or Purchase Information.Do not put “40% off”, “Download it in our websites” and other similar statements regarding your prices and other promotional information you advertise. You can do these things on your timeline but not in your cover photo.

No Contact Information. Don’t include your website, Email, snail mail address and other contact information. Your contact information is better off listed in your page’s About section.

No References to User Interface Elements. Don’t include “Like us”, “Share” and other Facebook engagement actions on the photo cover. Arrows pointing to the like button is not allowed as well.

NO Calls to Action. Don’t put “Get it now!”, “Tell your friends about us” and other similar statements which suggest a certain action towards your visitors. You can do these things on your tabs and timeline.
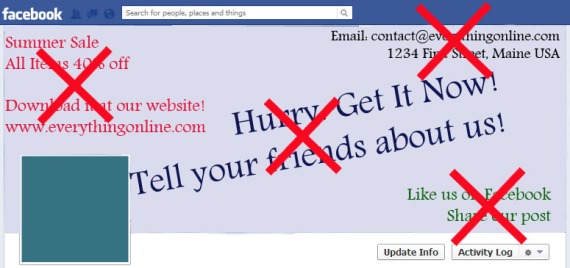
Facebook cover photo don'ts

Facebook timeline photo cover rules

Your cover photo is the part of your pager where you really need to experiment and be creative in order to grab attention right at the very start and get that page like you deserve.


Highlighting, pinning and milestones

There are new ways to showcase you post in your timeline. Now you can “highlight’ or ‘pin to top’ your post so that your audience any important posts or events you need them to know immediately.

Your timeline is divided into two columns, in which, your most recent post occupies the top left corner of your timeline. When you ‘pin to top’ a post it automatically sends the post to the top left corner of your timeline. That posts now becomes the first article of your timeline, thereby, giving it a greater chance for engagement. A pinned post stays in that position for 7 days or until you create your next post after said number of days. You can only ‘pin to top’ one post at a time.

Highlighting makes the post wider. A highlighted post takes both columns on your timeline. This makes the post very noticeable and hard to miss. You can highlight more than one post. The best posts to highlight are photos and videos.  Note that you cannot “pin to top” and highlight a post the same time.
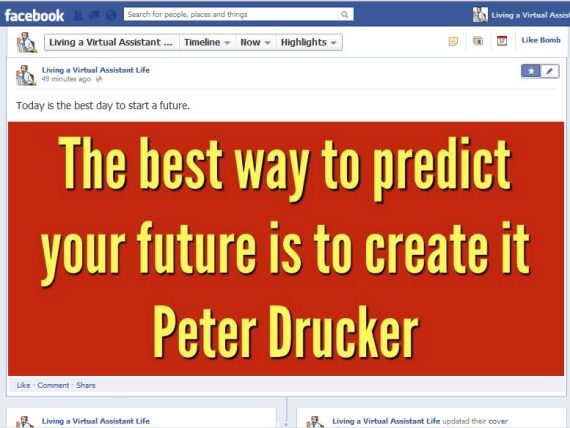
Highlighting lets you see the whole picture.

Highlighting lets you see the whole picture.

Milestones are important events you want to insert in your timeline.  Examples of milestones are the day you launch your company or a product, your first sale, the completion of a very big project and any other events you want to document. Now you will be able to remember these dates from your timeline. Milestones are like highlighted posts which occupies the full length of your timeline.

These are just some of the new features in the new Facebook timelines. To create your own Facebook page for your business, follow my step by step tutorial below. It also includes instructions on how you can upload your cover photo, post your updates and highlights.

There are a lot more features which I hope to cover in future tutorials so keep coming back or better yet subscribe to my blog to get future updates and tutorials. Please like this post or leave a comment if you have any questions about things I discussed or fail to discuss here. Thank you and I hope hear from you soon!


How to use Pinterest

Pinterest is a relatively new and popular social networking site. It is a basically a photo sharing site which allows you to pin photos to your wall and share them to other Pinterest users.  So you might be surfing the web and you find a particular photo or video and store them into a board. The pinned image links back to the site from where you found the image. So, what you are doing basically is bookmarking that image to your Pinterest wall or board and sharing the image forward to others. The boards here are categories you set for yourself based on your interests.

How to use Pinterest

By ShardsOfBlue

So if you are motivated in the Art, Fashion, Do-It-Yourself Crafts, Photography, Travel, and so forth, you can use Pinterest to create visual boards that you can use as inspiration for your work or projects.  Pinterest also allows you to pin videos.  I have tried it by pinning some favorite music videos I regularly listen to in Youtube.

Pinterest relies heavily on photo sharing. If you like collecting and sharing photos based on your personal interests or business, Pinterest is for you. In an internet marketer standpoint, you can use Pinterest to market your product. With Pinterest, you can drive more traffic to your site. Pinterest is also heavily linked with Twitter and Facebook.  You can share your pins and boards to these networking sites.

To join Pinterest, you need an invite. You can go to www.pinterest.com to request for an invite. Usually, Pinterest will respond to you and give you your invite within a week. Another way to get an invite is through your friends who already have a Pinterest account. I requested an invite from a Facebook friend and I got the invite in just 3 days.

Check out my tutorial on How to use Pinterest. It includes instructions on how to get invited in Pinterest, how to set-up an account, and basic functions of Pinterest. Also follow me on Pinterest at http://pinterest.com/cosmicdoggerel/. See you there!